Showing posts with label wip. Show all posts

Thursday, December 12, 2013

Progress: Sakura Kinomoto White/Pink Design


So after making Ultimate Madoka, I found myself with a good portion of leftover fabric, and decided I'd use that for my Sakura Kinomoto cosplay - I have other outfits that I like better, but I mean, how could I not since I had the fabric for this?
I know this progress is sorta lacking, but girl let me tell you. I made this costume in less than 10 hours, I was just on a roll!

This was my FIRST time making an actual petticoat, which was kind of intimidating, since I hate visible petticoats and knew that I had to do whatever I could to counter that, so what I did was to layer my pink lace over the bottom tulle, and it worked PERFECTLY. It did take some tries to find out how thick I wanted the upper part.

The two white layers are full circles with added width, so I could ruffle it, to make sure to get the poofy effect.


This was the second time I did a fitted shirt, and browsed through a lot a lot a lot of references, to make sure that I could make my own pattern.
In the end I figured it out and it actually fits me close to perfectly, which I'm very proud of, since I did all the pinning ON MYSELF, no help, no mannequin.


The finished dress doesn't have as puffy sleeves as the actual design, just because I didn't want to make those kinds of sleeves, I like the aesthetic of the bottom heavy ones better. And since it's a hall cosplay - I do what I want 8D

*Mirror shot, the socks are on the right legs.

Since there was so much going on with the lace, I decided to add some see-through patterned fabric I've had lying around to the top, just to pull it together, it's pretty subtle and doesn't show up much, which I'm good with.
And the socks and choker, don't you just love shiny satin? 8D haha, but I'm so happy that the white stretch isn't see-through at all, it's very solid and pure white.


I wore the costume out for the event at the National Museum, having recieved my wig (christmas gift from mustacheerbabu) the day before, so I hurried with the cutting and styling, so it's definitely not finished, but the color is just.. amazeballs, can't wait to show you all of this properly.

All I'm missing now is my stars, staff and bows :D


Monday, September 9, 2013

Progress and Product: Ultimate Madoka

This was my stage-costume for Genki 2013, and I must say... It's been some project. I've tried A LOT of new things, learned a lot about does and don'ts, and also how much I hate making frills.

I will say sorry for the very choppy WIP pictures, since I just snapped randomly during the process.

There's around 4 different variations of Madokami, with slight detail variations, which can pretty much make or break a costume, I decided for a mix between the simple and detailed, with the picture below as my main reference.


Saturday, April 27, 2013

Jason Todd: Bodysuit, Cape & Mask [Progress]

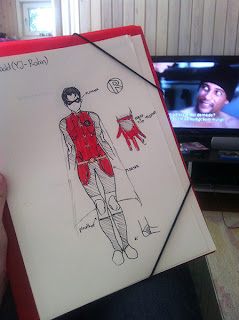
Some weeks ago, I was out fabric-shopping, for my extra costume for Desucon 2013, but didn't find a type of fabric that I wanted to use, and since I've had a lot of Jason Todd feelings, I decided to 'bring him home' instead.


I'm making the 'cameo' version from the series Young Justice, since it's the Robin version of him that I like the most, I like the details and think they fit his character a lot.
I know I'm not nearly ripped enough to actually imitate the 'boxing athlete' body of Jason, but I my love for the character just makes up for it in my mind. 8D

I wanted to make the whole suit and cape in pleather, but since the store didn't have the right type, I went with the 'generic' lycra/spandex-types, but since it is my first type doing something like this, I thought it was a fair middle-ground!

 
If I can't find a full-body short or licensed design of a character, I make a costume sheet, at least 90% of the times, this really helps, because I don't have to keep the whole design in my head, and remember details.


Most of the base bodysuit was finished by day one, and I realized I should stop slouching so much, haha.
The top is baggy, and that's because I've been unsure about how to make the top part wider (in a maaanly way)

I then started on making the cape, this was a first for me, and I have to say it's been one of the most challenging things ever, one; because I wanted to get it right in the first go. Second; I had no idea what I was doing.
But I'm satisfied with the result, and I like the way that it moves.


I bought a full-face mask for the 'cowl' (I wish, haha), just because I wanted to try it, next time I'll make the base myself. I'm still debating weather or not to cover it with pleather and then add some gloss (because I think it looks good when it shines)

Looks sorta uneven here, but I swear it's not XD
The thing I'm working on now is the details on the side, which I realized today is upside down, but unfortunately I have no way to bend my body in a way so I can actually pin them on, so for now (as you can see in on the left picture) it'll look like a mecha-suit for a futuristic magical girl.


 I can't wait to finish this costume! Super psyched!

Wednesday, March 27, 2013

Ion Fortuna: Patching and Plates

Finally got some work done for Ion, and I have to say that this have been the first time I had to do SO much prep-work for a costume. Making the small templates, then the larger patterns, cutting up the patterns (which I did not enjoy) and stitching on every piece to make sure it'll stay in it's place. It's fair to say I am ready to feel like I'm actually making progress!


It's been repetitive  but not as boring as I would have thought, because I kept shifting back and forth between four different things and two sorts of fabric. Right now it looks like someone have spilled blue-goo on my fabric, next step is gluing on rhinestones and adding gold-trim around EVERYTHING (as you can see  on the patterns)


Today I've been working on the back-piece shoulder plate, made out of funfoam, because it's cheap and easy to work with, and wonderfully lightweight, this costume definitely will not be light weight, so I'm saving where I can.
I'm still figuring out how I want the golden coverage, so it's shelved for now.


Wednesday, November 21, 2012

Ion Fortuna, Come at me.

I have a lot of projects for the coming year, the most daunting one, is Ion Fortuna of Trinity Blood. I'm actually not a Trinity Blood fan, but as soon as I saw this design, I felt extremely inspired, and couldn't help myself for making it a plan for next years Desucon.

All the sowing will not happen before next year though, so I'm trying to make most of the jewelry before that.
So here's a picture of the design that I'm working on, just so you know what I'm getting myself into.


Some months ago I started trying to figure out the detail designs for the domes, which is not easy mind you, since there really isn't much specific details on it. (artwork why?)
And since I know this isn't going to be a lightweight cosplay, I used Styrofoam, just to make it slightly lighter than clay would be.


And the the project was actually pretty much off until now, because I haven't been in a cosplaying spirit. BUT, today I visited an antique jewelry shop near my house. And oh my gosh, I found so much I can use for him, I really had to restrict myself from not buying everything they had in there (It was cheap too!)

So I got a varies of different beads, dangly earrings, broaches and stuff alike.
I also found a bag with all sorts of different kinds of beads, but most were silver, but that's nothing a little paint can't fix.
*click the imagine for the delicious details


So yes, that's an actual update!
After this find, I'm excited to start working on Ion again

Thursday, June 14, 2012

Noel Kreiss: Bag, Sheath, Armor

Since Darth Vader aka Desucon is coming up REAL SOON,  I'm working hard to finish all the things for Noel Kreiss. I can't believe I said yes to make this cosplay, so many things and details, haha.

Also doing my best to take progress pictures while doing all of that.
So here we go, in not particular order, Because it doesn't really matter.

I've finished the arm 'armor' thing, it actually didn't take too long to make, or maybe it did, I was entertained by True Blood and my girl that kept undressing and redressing.

*Remeber, all pictures have bigger versions, To inclickety and beyond!


It's held on by two broad elastic bands, covered with pleather, for comfort.


I also finished his fannypack,... and now that I think about it, I actually haven't /note to self: remember the beads.
Anyway, since I'm using this as an actual bag, it's firmly secured, and the innards have an extra pocket for easy access or whatever.


The belt(lower) and belt strap(upper) is almost finished. I had to redesign the pattern on the strap, after a closer look at the actualy design, so it was a little improvised, but I still kinda like how it turned out.


The 'silver charms' are made with a base of foam and then covered with paperclay. I'm still not used to working with clay, since I'm so impatient.


Finished the sheath for his 'extra' dagger, the color scheme is a little free styled, but I'm still pretty satisfied.
It was only yesterday, when I had to start working on the handle of the dagger, that I noticed there was text on it, so  I swung the marker.


I wanted an easier way to make the blue part of the collar, instead of embroidering, so I got some dark velour and sewed it on, also a little extra picture of the shoulder strap, that I still haven't finished.


I've also been helping my guy Hayes with his Maqui cosplay, and he's going to look pretty amazing if I don't say so myself (Do notice: I have NOT touched the cosplay at all, it's all his work and my guidance)
As stupid as I am I used oil-based paint on the bolster of the dagger, so it's taking forever to dry.

Monday, April 30, 2012

Noel Kreiss: Finishing sandals, belt & wig work.

*All pictures have bigger versions for your enjoyment

After my last entry, I continued with the shoes until they were finished, what can I say? I was on a roll.
So since I finished with that, I've kept on with the pleather work and started on the 'main' belt, cut the wig and made the first make-up try. /All the while I'm embroiding every day, so busy.

This time, I didn't take too many pictures though, I was in the zone and just snapped a few, whenever I remembered, so this entry might seem a bit choppy.


The outer "fold" of the shoes, I made with the same texture pleather, as I did the tip, and the result is definitely much better than than I expected it to be.
I attached it with hotglue, textile glue and stitching where my needle would pull through, don't want it falling off suddenly, now do we?


Now this was the part I dreaded the most, I did a few tries on scrap, but still I was very worried that the fabric would be ruined if the loops slipped. Thankfully it didn't and it ended up looking real neat.


So here's the finished result... well finished and finished, I need to measure the laces and cut them, also remove some glue from the edges of the sole.
There is some small changes from the original design, but that's purely for aesthetic and comfort reasons.


As said, I got my wig, it's been cut and I'm slowly figuring out how I want it to be styled, since I want it natural and without as much product as I usually use.
The make-up is pretty natural as well, but actually as close to his look as I could get this time around. It was pretty entertaining doing, because looking closely at the artwork, you can see the colors that've been used to shade around his eyes and lips, definitely a catering to the cosplayers, haha.
Also, the reason that the wigs looks lighter, is because it's layered with powder, to make it more natural looking. /of course it shines through on direct flash like this. + awkward smile for your enjoyment


And lastly, I'm working on his leather belt, and I have to thank my roomate, Nadia, for leaving me a lot of scrap-fabric, that inspired me to use the textures I'm using in the belt! In itself, the process is pretty boring, so no more pictures than this, I'm sure you can imagine the rest.


Tuesday, February 7, 2012

Working on the little things

Since I'm a master procrastinator, I need to have several projects to work on, or I'll never finish or get to anything. Right now I'm working mostly on Noel Kreiss and Argentine.

Argentine is actually close to being finished, but as I said, I procrastinate.
These few photo's I took are just to show how I added the 'pattern' to the outer jacket, and from that point on, I really haven't taken any pictures, because everything is pretty much straight forward, which is why I can say at this point, I'm sure I'll be very happy with the result!


I'm not Richie Rich this month, so I have to work with what I got, and since Noel have SO MANY /many many many many minor details, pendants and embroidery, I figured I'd at least get started on something I have the materials for.

Got out my foam, cut it into circles and added small pricks of hot glue around the edges, added some designs to the neck-pendant and then layered it twice, with an all-around glue that dries clear.


Afterwards I added two/three layers of silverpaint, until I liked the coverage. And this is the finished result.


The hardest part about making these was the patterns /also made with hot glue since the full character image and in-game shots leaves A LOT to the imagination, so I kept it as simple as I could, without making it boring.

So that's my progress for this time.

Tuesday, January 3, 2012

Process on Current Projects

Right now I'm working on several cosplays, all small/big things, that I might be very annoyed with, when I actually have to finish the costumes.
There's costumes I still want to get started on, and I'm going out to buy fabric this month, so I can get busy.


I started on Shaak Ti's headpiece about a month ago, and just building on it when I feel like being crafty.
I'm making a base of foam, paper and steelwire, to keep it both simple and lightweight, it's the same as I did for Kaito's horns, and they weigh next to nothing.


I've finished the base for Noel's sword/dagger, but the photo's I took screwed up the proportions of the sword, but it really isn't all that interesting right now anyway, I'm waiting for better quality photo's of it, but I'll hopefully start on his embroiding this month.


I've also recieved a Muramasa cosplay, yes, did not make this and I'm okay with that (making a pair of hakama's, forget it.)
I've started on the styling of the wig and also bought some of the stuff I'll need to make his katana.
I also need to figure out what shoes I want for him, but I got lots of time to figure that out.


In other news, I've had my nommelicious lense out for a test shoot, with Mustacheranger as my model, costuming Dark Mousy, which she does so well.
*click for sharper image

And that's all you're going to get from me, I still need to improve a lot.